Small outboards – less than about 20 hp – are super simple to install, especially if the outboard is a tiller-steer, pull-start model.
These are general guidelines; please refer to the engine manufacturer’s owner’s manual for instructions specific to your outboard.
In the Middle
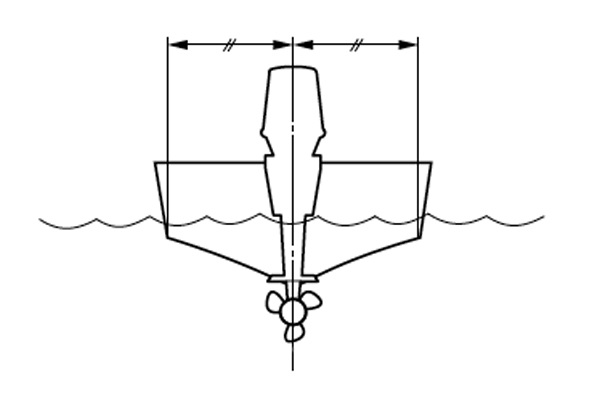
It’s important that you mount the outboard on the centerline of the boat. Some transoms have a dot or discreet mark indicating the center, making the job a lot easier. However, if you’re not so lucky, you’ll need to determine the transom’s center by finding the center of the keel and drawing a line (perpendicular or square to the keel) straight up to the transom. Or drop a plumb bob from the transom to the keel’s center and mark the transom accordingly. There are several ways to find the center, but none of them are particularly challenging.

On the other hand, if you’re simply reinstalling the outboard on your boat, put the engine back where it was last year, and double-check that it’s centered on the hull.
If the outboard isn’t in the center, the boat might be hard to steer and behave strangely while moving.
Turn the Screws
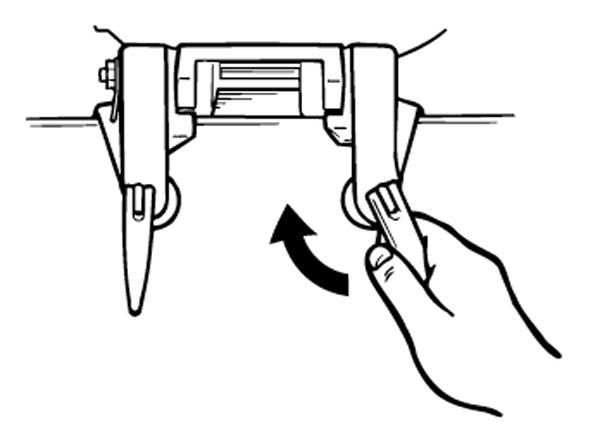
You’ve centered the outboard on the transom; now tighten the clamp screws to hold the engine on the transom. Turn the clamp screws in evenly, so the clamping pressure is about the same for both clamp screws. Tighten them as much as you can; ideally the clamp screw handles can fold over and meet in the middle, so you can padlock them together. Locking the handles together prevents the clamp screws from working loose and deters those who would be inclined to abscond with your outboard.

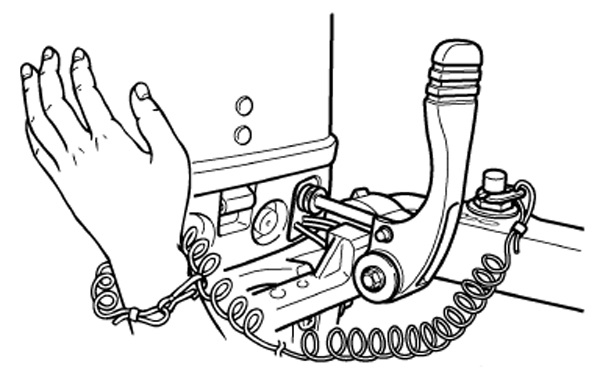
If your Yamaha outboard has a place to attach an engine restraint cable, use a cable or chain to secure the outboard to the inside of the boat. This will prevent the outboard from unexpectedly coming off the boat.
Engine Height
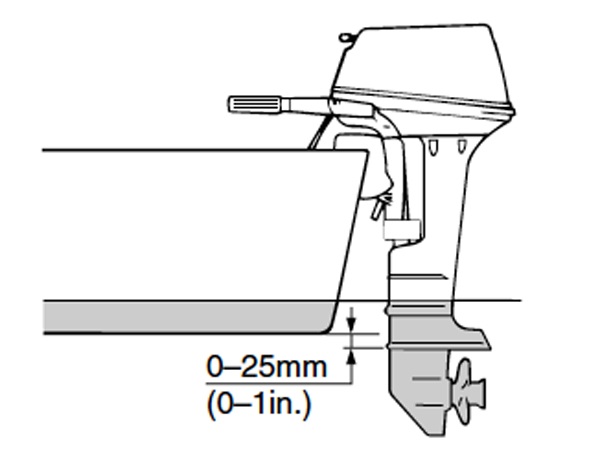
With the clamp screws tight, and the engine positioned vertically, check the engine height in relation to the bottom of the boat by placing a straightedge along the keel to the outboard. The anti-ventilation plate should be even with the bottom of the hull or slightly (an inch or so) below the boat’s bottom.
When installing an outboard, you need to make sure it's in the water deep enough for the gearcase to get enough cooling water for the engine and for the propeller to work well. But you don't want it so low that it causes extra resistance in the water.
If the outboard is too high or too low, adjust its position accordingly, and re-tighten the clamp screws.
CAUTION: Incorrect engine height or obstructions to smooth water flow (design or condition of the boat, boarding ladders, and transducers) can create airborne water spray while underway. This spray could deprive the engine of adequate cooling water, potentially resulting in severe engine damage.

Additional Security
Once the outboard is positioned properly on the transom (centered and good engine height), and you are ready to permanently install the outboard, it’s time to bolt the engine to the boat. If your outboard has provisions for bolts, the bolt holes should be located towards the bottom of the clamp bracket. We recommend marking the holes and removing the engine before drilling through the transom.
After you’ve drilled the bolt holes, blow out the shavings from the drill bit, and apply marine sealant to the inside of the holes. Re-mount the outboard, snug up the clamp screws (not extremely tight yet), then start the bolts through the transom and the clamp bracket (bolt head on the inside of the boat).
NOTE: During water testing, check the buoyancy of the boat at rest, with the maximum load in the boat. Check that the static water level on the exhaust housing is low enough to prevent water from waves and wakes entering the powerhead when the engine isn’t running.
Check to make sure the outboard is still centered on the transom, and the engine height is OK, then snug down the clamp screws to max tightness, and torque the transom bolts – without crushing the transom.
Use only the bolts that came with your engine, or stainless-steel equivalents, including flat washers and lock washers, to keep everything in its place.
Check the clamp screws and transom bolts for tightness after running the boat a few hours (and periodically throughout the season) – re-torque
as necessary.
WARNING: Overpowering a boat can cause severe instability. Don’t install an outboard with more horsepower than the maximum rating on the boat’s capacity plate. If your boat doesn’t have a capacity plate, consult the boat manufacturer.
Finish the Job
The outboard is on the boat, now you’ll need to connect the fuel line, and do all of your pre-op checks (fuel filters, oil levels, propeller installation, etc.) before you hit the lake.
Don’t forget the engine stop switch lanyard and required safety equipment as you’re loading your gear.

NOTE: Loose clamp screws could allow the outboard to fall off or move on the transom, causing loss of control and potential injury. Make sure the clamp screws are tightened securely, and occasionally check the screws for tightness during operation.
Back to Blue Life
These are general guidelines; please refer to the engine manufacturer’s owner’s manual for instructions specific to your outboard.
In the Middle
It’s important that you mount the outboard on the centerline of the boat. Some transoms have a dot or discreet mark indicating the center, making the job a lot easier. However, if you’re not so lucky, you’ll need to determine the transom’s center by finding the center of the keel and drawing a line (perpendicular or square to the keel) straight up to the transom. Or drop a plumb bob from the transom to the keel’s center and mark the transom accordingly. There are several ways to find the center, but none of them are particularly challenging.

On the other hand, if you’re simply reinstalling the outboard on your boat, put the engine back where it was last year, and double-check that it’s centered on the hull.
If the outboard isn’t in the center, the boat might be hard to steer and behave strangely while moving.
Turn the Screws
You’ve centered the outboard on the transom; now tighten the clamp screws to hold the engine on the transom. Turn the clamp screws in evenly, so the clamping pressure is about the same for both clamp screws. Tighten them as much as you can; ideally the clamp screw handles can fold over and meet in the middle, so you can padlock them together. Locking the handles together prevents the clamp screws from working loose and deters those who would be inclined to abscond with your outboard.

If your Yamaha outboard has a place to attach an engine restraint cable, use a cable or chain to secure the outboard to the inside of the boat. This will prevent the outboard from unexpectedly coming off the boat.
Engine Height
With the clamp screws tight, and the engine positioned vertically, check the engine height in relation to the bottom of the boat by placing a straightedge along the keel to the outboard. The anti-ventilation plate should be even with the bottom of the hull or slightly (an inch or so) below the boat’s bottom.
When installing an outboard, you need to make sure it's in the water deep enough for the gearcase to get enough cooling water for the engine and for the propeller to work well. But you don't want it so low that it causes extra resistance in the water.
If the outboard is too high or too low, adjust its position accordingly, and re-tighten the clamp screws.
CAUTION: Incorrect engine height or obstructions to smooth water flow (design or condition of the boat, boarding ladders, and transducers) can create airborne water spray while underway. This spray could deprive the engine of adequate cooling water, potentially resulting in severe engine damage.

Additional Security
Once the outboard is positioned properly on the transom (centered and good engine height), and you are ready to permanently install the outboard, it’s time to bolt the engine to the boat. If your outboard has provisions for bolts, the bolt holes should be located towards the bottom of the clamp bracket. We recommend marking the holes and removing the engine before drilling through the transom.
After you’ve drilled the bolt holes, blow out the shavings from the drill bit, and apply marine sealant to the inside of the holes. Re-mount the outboard, snug up the clamp screws (not extremely tight yet), then start the bolts through the transom and the clamp bracket (bolt head on the inside of the boat).
NOTE: During water testing, check the buoyancy of the boat at rest, with the maximum load in the boat. Check that the static water level on the exhaust housing is low enough to prevent water from waves and wakes entering the powerhead when the engine isn’t running.
Check to make sure the outboard is still centered on the transom, and the engine height is OK, then snug down the clamp screws to max tightness, and torque the transom bolts – without crushing the transom.
Use only the bolts that came with your engine, or stainless-steel equivalents, including flat washers and lock washers, to keep everything in its place.
Check the clamp screws and transom bolts for tightness after running the boat a few hours (and periodically throughout the season) – re-torque
as necessary.
WARNING: Overpowering a boat can cause severe instability. Don’t install an outboard with more horsepower than the maximum rating on the boat’s capacity plate. If your boat doesn’t have a capacity plate, consult the boat manufacturer.
Finish the Job
The outboard is on the boat, now you’ll need to connect the fuel line, and do all of your pre-op checks (fuel filters, oil levels, propeller installation, etc.) before you hit the lake.
Don’t forget the engine stop switch lanyard and required safety equipment as you’re loading your gear.

NOTE: Loose clamp screws could allow the outboard to fall off or move on the transom, causing loss of control and potential injury. Make sure the clamp screws are tightened securely, and occasionally check the screws for tightness during operation.
Back to Blue Life
