Yamaha Pro Angler Spencer Deutz grew up fishing tournaments with his dad and brother in lakes across the Midwest region of the United States. Hooked from a young age, Fargo, South Dakota-native Spencer kept his competitive fishing going and today still competes in the Casino Cup Walleye series as a few AIM® Walleye Series events during the season.
His impact on the future of fishing, however, grew substantially in 2008 when he became involved in the National Professional Anglers Association (NPAA) and the Future Angler Foundation. Since that time, Spencer has spent countless hours with youth and families teaching clinics about the basics of fishing, helping to grow the sport by encouraging the next generation to pick up a rod and get out on the water.
The Blue Life team reached out to Spencer, an expert who can clearly explain the basics of boating to beginners, to share what he believes are the six most important basic knots (three for fishing and three for your boat) to know if you plan to do a little fishing and boating this season. Here are his top picks!
Knots for Fishing
1. Improved clinch knot: This knot is very common and used by many anglers. Though not the strongest knot, it’s easy to tie and good for almost any application, unless you plan to fish extremely heavy cover or rocks. If you can tie one and only one fishing knot, this is the one.

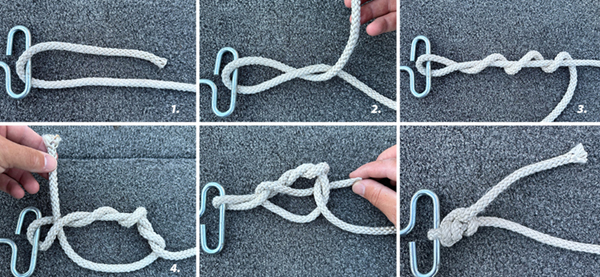
Improved clinch knot: 1) place the end of the line through the eye of the hook and pull it back up towards the main line
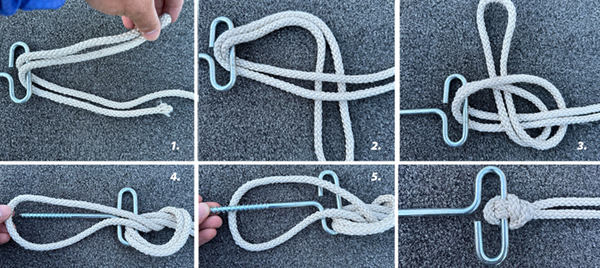
2) wrap the end of the line around main line 5-6 times 3) Place the end of the line through the hole created just above the hook 4) Take the end of the line and thread it through the hole created in the center and pull tight2. Palomar Knot: This is the strongest knot when it comes to tying a fishing line to a bait or a hook. It’s the perfect knot for fishing heavy cover, rocks or situations where you have many opportunities to get snagged. Use this knot if you are planning to target heavier fish – in the 20-30 pound range – such as muskie.
Back to Blue Life
His impact on the future of fishing, however, grew substantially in 2008 when he became involved in the National Professional Anglers Association (NPAA) and the Future Angler Foundation. Since that time, Spencer has spent countless hours with youth and families teaching clinics about the basics of fishing, helping to grow the sport by encouraging the next generation to pick up a rod and get out on the water.
The Blue Life team reached out to Spencer, an expert who can clearly explain the basics of boating to beginners, to share what he believes are the six most important basic knots (three for fishing and three for your boat) to know if you plan to do a little fishing and boating this season. Here are his top picks!
Knots for Fishing
1. Improved clinch knot: This knot is very common and used by many anglers. Though not the strongest knot, it’s easy to tie and good for almost any application, unless you plan to fish extremely heavy cover or rocks. If you can tie one and only one fishing knot, this is the one.

Improved clinch knot: 1) place the end of the line through the eye of the hook and pull it back up towards the main line
2) wrap the end of the line around main line 5-6 times 3) Place the end of the line through the hole created just above the hook 4) Take the end of the line and thread it through the hole created in the center and pull tight


.jpg)


