Lower Unit
 Engine Oil & Lube
 Lower Unit
 Fuel & Fuel System
 Power Trim & Tilt
 Electrical System
 Corrosion Prevention
 Extended Storage
 Propeller Solutions
 External Appearance
 Additional Tasks
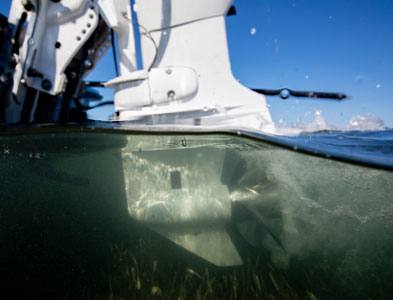
KEEP THE GEARS IN MOTION
The lower unit on a boat converts the power of your outboard’s engine to rotation of the prop shaft, which moves the propeller, which moves your boat. Without it, you go nowhere. Its internal mechanical workings put tremendous pressure on the lubricant inside.
This hardworking device just needs some simple, regular maintenance to help it stay that way.
How To Maintain Your Lower Unit
But if you prefer to do it yourself, your Yamaha Marine dealer can set you up with a Genuine Yamalube Oil Change Kit, specific to your Yamaha outboard. It includes the right type and amount of Yamalube marine oil, a Genuine Yamaha oil filter and a drain gasket. Everything you’ll need to do the job right. Kits are available in Yamalube 4M 10W-30 and 20W-40 weights.
- Start and warm the outboard to normal operating temperature, then shut it off.
- Tilt engine up halfway and allow to rest for 5 minutes to thoroughly drain the oil back into your outboard’s crankcase.
- Trim the outboard back down to level. You can place a small level on top of the anti-ventilation plate to help you determine when to stop.
- Pull the dipstick, wipe the oil from it and re-insert it in the crankcase. Then pull the stick again and check the oil level. This helps ensure proper venting for accurate indication.
- At the proper oil level, the oil should be halfway up crosshatch pattern on the dipstick.
Tip: The top and bottom of the crosshatch pattern on the dipstick do not represent “high” and “low.” The correct oil level indication is at the mid-point of the pattern. Use caution when filling or adding oil. Yamaha 4-stroke outboards have a tapered oil sump design (smaller at the top than the bottom), so the closer the oil level is to full, the faster it fills.
Therefore, add oil slowly and in small amounts, and do not attempt to “top off.” Do not allow the oil level to surpass the upper portion of the crosshatch pattern. Doing so may result in aeration of the oil, reducing lubricity and oil pressure, and may cause eventual engine damage.
Videos
Lower Gear Lubricant
Your boat and outboard at your fingertips.
 The Siren Connected Boat App
Dealer-completed service. DIY maintenance. Track it all with the Siren Connected Boat app. It puts a full maintenance history at your fingertips. Plus, you can remotely monitor and control critical boat systems and security, and more when properly equipped.